 Faced with the choice of furniture for the kitchen and living room, many craftsmen do not run to the store, but decide to make a table out of chipboard according to their own tastes. This method is faster and relatively cheaper. Even with minimal DIY skills, you can make a homemade table. In addition to the obvious advantages, a table will stand out due to exclusivity. Everything you need for work can be found in the house.
The process of making furniture with your own hands is filled with pleasant bonuses. The craftsman chooses the design himself, takes into account the layout of the apartment - and you don’t need to go to furniture stores with a tape measure in your hands! A person fully reveals his own creative potential, extracting a lot of benefits in terms of costs and the acquisition of new skills. Consider the process of making two tables: a large kitchen and a small coffee table in the living room.
How to make a table in the kitchen from chipboard with your own hands
 A table in the kitchen is the most used of all the furniture in the house. It is after him that people eat, spending the most time talking. The table should be outwardly attractive and durable. Chipboard is an ideal material for kitchen furniture, since its advantages are practicality and a long service life. In addition, it is a lightweight material that is easy to process and create a complete kitchen table.
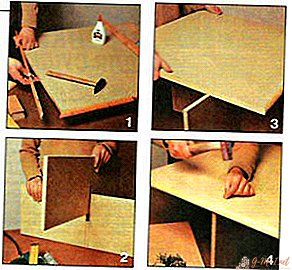
Table drawing
You can make a drawing of the table with your own hands - absolutely according to your own preferences or use the template we have proposed.
IMPORTANT! Be sure to take into account the dimensions for the workpieces, both in an independent scheme and according to ready-made templates. Otherwise, there will be an opportunity - the finished table will be smaller or larger than the required size.

Consider the simplest in design table with a wide but small countertop, four legs and reinforcing supports.
Necessary tools and workpieces
The first step is to prepare the necessary tools. For fruitful work you will need:
- a drill or a screwdriver - it is better to take small models so that the attachment points look nice;
- circular saw, milling cutter and jigsaw;
- auxiliary tools: level, square, tape measure, drills, countersinks;
- a set of hex keys;
- hand saw on wood;
- conductor.

IMPORTANT! The main work on cutting and preparing blanks is best done on the street (for example, in a garage). So the level of noise and pollution will not affect the house.
To assemble a dining table from chipboard, the following details will be required:
- 4 side racks (74x46 cm);
- countertop (95x56 cm);
- support frame for countertops (2 pcs. 3x5 cm: length 72 cm, 2 pcs. 30 cm);
- 10 furniture corners;
- lower strut (4x3.5 cm: length 74 cm).
All blanks are cut from chipboard sheets. In addition, self-tapping screws will be needed to fix all the parts.
TIP! Before you start cutting parts, it is recommended to draw them on a chipboard sheet with a simple pencil. Get a kind of wooden pattern.
We make components
The table top is always cut first - you need to round the corners, giving it the desired shape using an electric jigsaw. The second one is going to the frame for the strength of the countertop - 4 pieces are joined together, fixed to the corners or screws. The thrust frame must be positioned exactly in the middle of the countertop canvas.
Third will be the side racks:
 draw horizontal lines from the edges on a suitable plate;
- make marks in the form of ovals;
- cut drawn ovals;
- cut the center on the plotted strip.
 draw horizontal lines from the edges on a suitable plate;
The second rack is made in the same way.
We assemble the table
Place all parts on a flat surface. They also begin assembly from the countertop. You need to step back 11 cm, drawing horizontal stripes - you get a square just in the center of the plate. It is in it that the frame will be located - to fix it. Next, make marks for the side pillars, likewise attaching them in the center, but already to the thrust frame.
 After assembly, it remains to enter the lower stop bar for the spacer legs, secure with the corners. For the sake of strengthening, the side racks are once again scrolled with screws - on the outside of the countertop.
It is important to remember that before assembly, all parts must be cleaned and processed - for example, putty and varnish. Or you can glue it with a special film.
How to make a coffee table from chipboard
A coffee table is twice as easy to assemble as it is compact and does not require a lot of work. Such a table, as a rule, is low - at the level of a sofa, or even lower. The simplest scheme is to place a round countertop on 2 parallel bars. The most convenient, budget and fast. But, to make something more serious, similar tools and components will be required.

We make a table drawing
You should independently make measurements and calculations or use a ready-made scheme by simply copying it. The main thing to remember is that even you can change them for yourself. Be sure to consider the size.

We prepare the components
The coffee table will consist of the following details:
- countertop (75 cm by 70 cm);
- 4 slats (46 cm by 10 cm);
- 2 flat shelves (70 cm by 50 cm);
- 4 legs or wheels;
- in addition: komfirmaty, self-tapping screws, plastic corners and material for processing.
Depending on the wishes, there may be just legs and wheels. Or you can combine it by cutting holes for the wheels in the legs - so the table will be mobile and easy to move.
Table assembly
The table top and lower shelves should be cut independently. Before work, it is necessary to sand the sheet, then make pencil markings and cut out the details.
All end elements should be glued with a decorative edge, and then proceed with the assembly of the countertops, shelves and side slats using corners and screws. The next step is attaching the bottom. Further equipment with legs or wheels.
IMPORTANT! It is recommended to mount the supports at least 1.5 cm from the edge.
The little table is ready, it remains only to decorate it and check the strength.
The final stage is decoration
 The matter remains small - the prepared surface must be covered with a transparent varnish or a decorative film. Before painting, you should also treat the table with impregnation to neutralize the glue. In addition, the table will become moisture resistant. It is better to put a varnish in two layers. You can also attach an LED strip inside the table as a decoration.
Having spent free time and some money, you can get a convenient and unique table. The main thing is not to be afraid of your own mistakes, but to turn failures into a unique charm of furniture.
Leave Your Comment