 Do you have a small child, or are pleasant changes coming soon? So it's time to make changes to the interior. Waiting for a miracle makes you think about arranging a children's room. For a safe and comfortable sleep, the baby will definitely need a high-quality and comfortable bed. A huge selection in stores allows you to purchase the right model. But if there is a desire and some skills, it is best to make a crib with your own hands. Try it, it’s not difficult at all. Saving the family budget will be a nice addition and give you the opportunity to buy something else useful.
Despite the complexity of the design of modern furniture, options can be made much simpler. We will tell you how to make a crib that anyone can handle. This will not require special skills. Just stock up on materials, patience and follow the instructions.
Now in retail outlets you can find a huge variety of products of this kind. Among the wide range there are really good options, but there are also products of poor quality that do not comply with safety regulations and operating rules. Particular attention when choosing in a store and when making it yourself should be given to the following points:
- Structural strength. You can check in the store yourself.
- Type of material: metal, wood, plastic.
- The shape and size of the crib. They must be appropriate for the growth and age of the child to ensure comfort and safety. Collapsible playpens are suitable for the smallest, which are convenient to install and remove in case of uselessness or for carrying.
- Reliability. The case itself should not contain traumatic parts: sharp corners, hooks, notches. If it is wood, then it must be sanded and varnished.
- Security. There should not be any small particles inside that may fall off the frame. Young children can pull them in their mouths.

IMPORTANT! In addition to sleep, the bed must also perform a protective function. In order for the child not to fall out and injure himself, all details must be correctly performed. This will allow you and your child to relax comfortably and without danger to health.
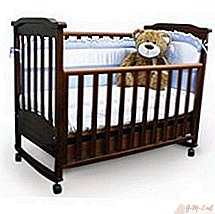
Let's decide on the main parts of the berth. Before starting work on the manufacture of any furniture, you should carefully study its features and figure out which structural elements are included in it. We will not dwell on private examples and show on the classic version what any crib consists of.
The following important elements are distinguished in its design:
- Bottom surface or bottom. Pay attention to the distance between the floor beams, it should be sufficient for normal ventilation and at the same time not too large to make it convenient to lie.
- A mattress that is located directly below the bed.
- Side overlap. Lifting height is selected based on the height of the child. They are the ones that prevent the fall.
- The front and rear backs of the crib.
- Durable legs that support the entire structure.

The advantages of such a product will be a shape that is suitable specifically for your parameters and quality materials that you can choose for yourself.
First you need to plan the location of the future product and decide what type of design is right for your room. There are several basic types:
- The classic version. You can attach painted plywood to the body for decoration or cut out the car frame from it.
- Bunk or loft bed. Great for small rooms. If you have two kids, then such a structure will save space and delight children.
- The playpen is specially adapted for the smallest. An artificial barrier will not allow the baby to fall and be injured.
- The corner with drawers is a very convenient version, which will allow you to hide the necessary things and save space.

Make all necessary measurements of the room so that the bed does not interfere with the placement of other furniture and blends harmoniously into the interior. After that, you can proceed to the initial stage.

First, you need to prepare all the necessary materials, which will be discussed below, make the necessary calculations and create a drawing. The quality of future work on creating furniture depends on well-conducted preparatory measures. At this stage, you can calculate everything in detail and take into account the important points in the installation of the crib. A plan for creating a diagram will help you do everything quickly and correctly:
- Draw a rectangle according to the size of the future frame.
- Display the height of each wall in the drawing.
- In the bottom and walls, it is necessary to place wooden beams, which will be the overlap. The optimal distance between them will be 3-5 cm.
- Set aside the legs of the required height. They should be set down and up from the base, as they serve as a support.
- The basic elements are ready, add the image of the upper crossbars lying on top of the wall and fixing it to the diagram.
- In the drawing, highlight in red the main places for fastening and joining parts. This will help you navigate the assembly diagram.

If necessary, you can make the frame more interesting and add various decorations and decor elements to it. It all depends on your imagination. We offer a general construction plan.

Materials and Tools
For work you will not need any special devices. In this case, you can do with the standard set, which is used for the manufacture of any type of furniture:
- To build the scheme, you will need a ruler, a measuring tape, a carpenter's pencil, paper.
- A solid wood is best suited as a material choice. It is durable and environmentally friendly, which is important for the health of the child.
- Bars or slats for floors.
- Hand saw.
- Electric jigsaw.
- Corners for mounting the base. It is better to use this particular method. Wooden joints often break.
- Screwdriver and set of screws.
- Hammer with nails, screwdriver, screws.
- Building level.
ATTENTION! The estimated amount of material is determined by your size. But even with accurate calculations, you should take everything you need with a margin, because during the work a defect may occur or a part may break.
The procedure for making a bed at home
If you have thought everything through and prepared well, then it's time to start the most interesting stage. We begin to build furniture in accordance with the plan of the drawing.
Step by step instructions:
- Transfer the drawing to a tree and cut according to the marks. You will receive the required parts for assembly.
- Treat the tree with sandpaper and cover it with a layer of impregnation.
- Let it dry.
- Make a frame, for this, connect 4 legs with each other using wooden boards and fasten with metal holders and screws.
- At the bottom, put the ceiling from the beams, which will serve as a support for the mattress.
- Also attach beam rails to the side walls.
- On top of the beams, lay a crossbar that will fix the frame to each other.
- Fasten all joints of parts with metal ties.

IMPORTANT! When performing all work (especially when painting and varnishing), ventilate the room to avoid headaches and dizziness. Observe safety precautions. At all stages, check that the attachment is correct using a level. The design should stand straight and not give in to swaying.
Congratulations, the baby cot is ready!
Leave Your Comment