 Each house uses a vacuum cleaner for cleaning. Ease of use is undeniable. If this unit breaks down, you have to think about the possibility of self-repair. If the user has the technical skills, you can try to identify a malfunction by independently disassembling the vacuum cleaner motor, thereby saving on expensive maintenance in service departments.
How to disassemble a vacuum cleaner motor
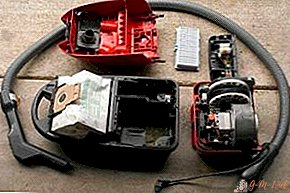
The presence of extraneous noise, cod, or sparks when the vacuum cleaner is turned on indicates an urgent need for repair. First of all, hull plastic parts are removed to gain access to the motor of a faulty unit.
ATTENTION! When disassembling a plastic case, it is impossible to apply great efforts to press on the connection elements. They break quickly, and it is very difficult to restore them.
Tools and Supplies
Each master has an individual approach to the performance of locksmith work and, accordingly, the devices for performing the task may differ. But, disassembling the electric motor, it is advisable to do using the following tools:
- small vise;
- file;
- screwdriver set;
- hacksaws;
- pliers;
- several wooden blocks;
- set of wrenches.
Disassembly Stages
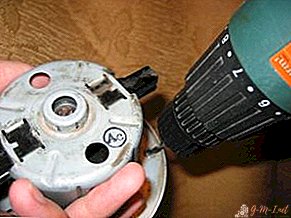
After removing the plastic panels of the vacuum cleaner body, we get access to the engine and proceed to disassemble.
- First, disconnect the electrical contacts from the motor terminals.
- Then, using a thin screwdriver, unscrew the screws, spring clips of contact brushes and brush holders. After that, the impeller protective cover is removed by lightly tapping the outer surfaces of the housing with a hammer. In order not to damage the case, hammer blows are best done through a wooden block.
IMPORTANT! Some models have a sealed impeller protection, to remove which it is necessary to bend the curved elements of the casing, and then remove the casing.
Then the impeller nut is untwisted. This is the most difficult and crucial moment of disassembling the engine. Consider the applicable options for fixing the axis on which the nut is located:
- Wedging of the space between the stator and the rotor. This method is often used by "home craftsmen." A suitable size screwdriver is inserted into the cavity between the rotating elements of the motor and wedged. The simplicity of this method often has a deplorable effect on the further operation of the motor, since the surface of the stator or rotor is damaged.
- Clamp in a vice. For the correct use of the method, wooden bars are made, which are placed in the cavities of the brush holders. Using medium force, wooden sticks together with the motor are squeezed in a vice until the rotor axis is fixed.
- Design features of some models of vacuum cleaners allow you to make a cut on the end surface of the armature shaft. If the axis extends beyond the nut by 1 cm or more, then the application of this method will be rational. The cut on the axis of the anchor must be done with the stator fixed, a hacksaw for metal or a grinder.

Sawing is sometimes performed on the shaft and nut at the same time. But at the same time, the body of the nut must not be filed, more than 30% of the thickness.
IMPORTANT! After performing the cut, it is required to remove all the chips so that it cannot get onto the rotating elements of the electric motor. Residual metal particles can cause a short circuit.
Another method of fixing the rotor is the use of a choke. Copper-based wire, kapron rope or a rigid cord is used to immobilize the axis of the anchor. For this, the selected material must be folded in half and inserted into the stator openings to access the rotor. To entwine the outer surface of the anchor, bring the fixing cord into the hole that they started. Then it needs to be passed through itself and to fix a rotor firmly. This method is very safe, but not always effective. The nut may not loosen when using this method, because the friction between the anchor and the cord does not allow to break the tightening force.
After choosing the available method for fixing the rotor shaft, unscrew the nut and remove the stator impeller.
IMPORTANT! Unlike conventional threads, the right-hand thread is used on the armature shaft, so you need to untwist clockwise.
Further:
- An access plate for fixing the upper bearing of the armature is unscrewed by means of a screwdriver, often a Phillips screwdriver. To exit the plate from the grooves, it is pry off with a flat screwdriver and gradually pulled out.
- After separating the plate by 1-2 centimeters, it is fixed on the support. As the latter, use wooden blocks, which are installed between the plate and the stator housing. Now the anchor with the bearing is knocked out of the plate. To do this, use a hammer with a wooden block in order to preserve the integrity of the thread that is hit. When the armature bearing is released from the mounting in the plate, the rotor is pulled out.
Vacuum cleaner motor disassembled. After that, inspect all the nodes and identify the reason for disassembling the vacuum cleaner.
What could be the malfunctions
Visually determine the integrity of all nodes in a disassembled form. When detecting obvious defects - eliminate:
- Bearing wear. When scrolling the shaft, even before disassembling, rotation is accompanied by an extraneous sound. After disassembly, make sure the integrity of both bearings. If a malfunction is found, replace.
- Extraneous sound during the operation of the vacuum cleaner may be associated with the axial displacement of the impeller. After removal, it must be carefully inspected, especially the place of landing on the shaft. If bumps are found inside the bore, the impeller must be replaced.
- The cause of extraneous sounds during engine operation may be untwisted fasteners on the stator or rotor. When identifying such places, select the appropriate fasteners and eliminate the defect.
- Sparks that become visible when the vacuum cleaner is turned on are eliminated by replacing the brushes. However, during prolonged work with faulty brushes, soot forms on the surfaces of rotating surfaces. This carbon deposit is completely removed for stable operation of the vacuum cleaner.
- It is rarely possible to accurately determine the presence of damage to the stator winding or rotor after a visual inspection. For the accuracy of diagnosis, a tester is used that will give a clear answer. If the winding is faulty, it must be rewound or replaced with a new one.

After eliminating the identified defects, the electric motor with a vacuum cleaner is collected in the reverse order and is operated in the required mode.
It is difficult to imagine the establishment of a quality order without the use of such an assistant as a vacuum cleaner. The ability to properly disassemble and repair household appliances will save money and do not seek help from service centers.
Leave Your Comment